
In this article
Phase 1: Activate SchoolDay Login
Phase 2: Request SAML connector from support
Phase 3: Configure SSO in Google Workspace
Option A: Configure org-wide SSO (optional)
Option B: Configure an individual SSO profile
Assign an individual SSO profile to OUs or groups
Phase 4: Send SSO profile details to support
Phase 5: Upload the verification certificate
When configured, users who enter their Google email are redirected to SchoolDay to complete their SchoolDay Login MFA factors before accessing Google Workspace. This requires setup on both the SchoolDay side and the Google Workspace side, and involves coordination with SchoolDay Support to generate the required SAML connector.
Requirements
- Primary District Admin permissions.
- Google Workspace subscription: Enterprise, Business, or Education.
- Google account associated with a Google Workspace organization.
- SchoolDay Login enabled and configured with authentication factors.
Setup phases
|
Step |
Task |
Who acts |
|---|---|---|
|
1 |
Activate SchoolDay Login in SchoolDay |
District Admin |
|
2 |
Request SAML connector from support |
District Admin > SchoolDay Support |
|
3 |
Configure SSO profile in Google Workspace |
District Admin |
|
4 |
Send SSO profile details to support |
District Admin > SchoolDay Support |
|
5 |
Upload the verification certificate |
District Admin |
|
6 |
Test the configuration |
District Admin |
Phase 1: Activate SchoolDay Login
- Navigate to Connect > Administration > Login Methods > SchoolDay Login.
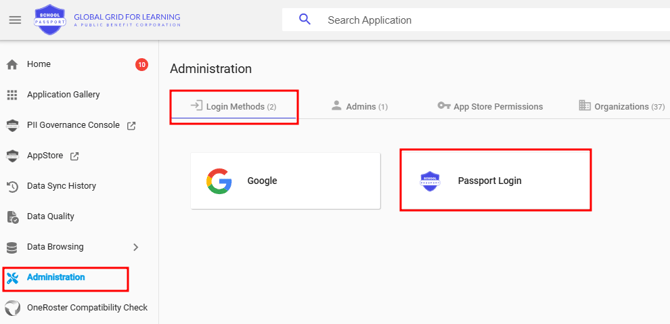
- Turn on the Activate SchoolDay Login toggle.
- Configure your authentication factors. See Configure MFA methods for users.
- Click Save.
Phase 2: Request SAML connector from support
Contact SchoolDay Support at support@schoolday.com. The support team will:
- Set up the SAML connector for your configuration.
- Provide the Sign-in URL, Sign-out URL, and IDP Entity ID needed for Phase 3.
- Send detailed instructions for the Google Workspace steps.
Phase 3: Configure SSO in Google Workspace
Choose the option that fits your deployment: org-wide SSO (all users) or an individual profile (specific OUs or groups).
Option A: Configure org-wide SSO (optional)
This applies to all Google Workspace users except super admins.
- Sign in to the Google Admin portal.
- Go to Security > Authentication > SSO with third-party IDP > Third-party SSO profile for your organization and click Add SSO Profile.
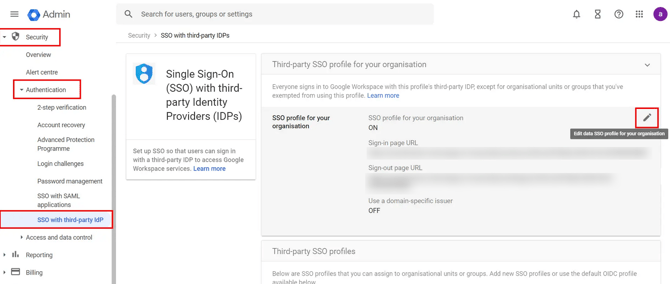
- Enter the following details:
- Sign-in page URL: https://sso.gg4l.com/saml2/Redirect/SSO
- Sign-out page URL: https://sso.gg4l.com/auth/saml/SingleLogout
- Upload certificate: select the certificate provided by SchoolDay Support.
- Change password URL (optional): enter the URL users will use to reset passwords.
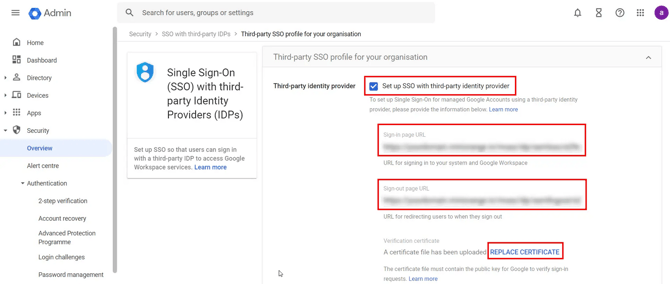
- Click Save.
Option B: Configure an individual SSO profile
This applies to specific OUs or groups only.
- Sign in to the Google Admin portal.
- Go to Security > Authentication > SSO with third-party IDP > Third-party SSO profiles and click Add SAML Profile.
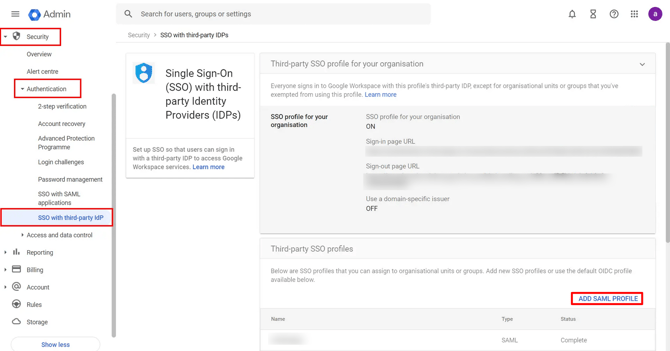
- Enter the following details:
- SSO Profile Name: enter a name.
- IDP Entity ID: enter the ID provided by SchoolDay Support.
- Sign-in page URL and Sign-out page URL: enter the URLs provided by SchoolDay Support.
- Change password URL: leave empty.
- Upload certificate: leave empty for now, added in Phase 5.
- Click Save.
Assign an individual SSO profile to OUs or groups
- Go to Security > Authentication > SSO with third-party IDP > Manage SSO profile assignments and click Manage (or Get started if first time).
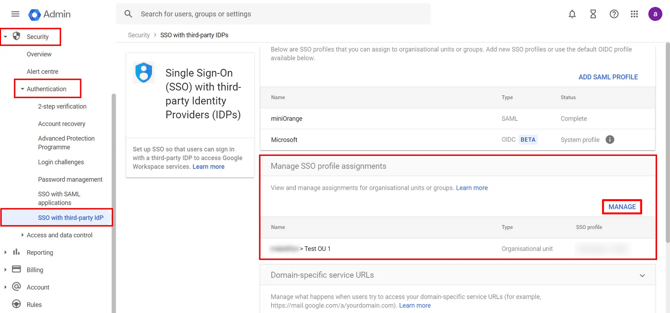
- Select the OU or group on the left.
- Under SSO Profile assignment, select Another SSO profile and choose your profile.
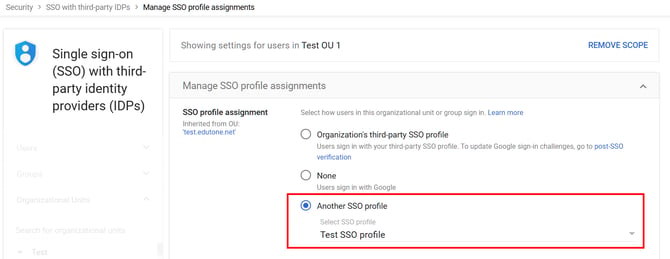
- Click Save.
Phase 4: Send SSO profile details to support
After creating an individual SSO profile, send the Entity ID and ACS URL to SchoolDay Support so they can complete the SchoolDay-side configuration.
- Go to Security > Authentication > SSO with third-party IDP > Third-party SSO profiles.
- Open the individual SSO profile.
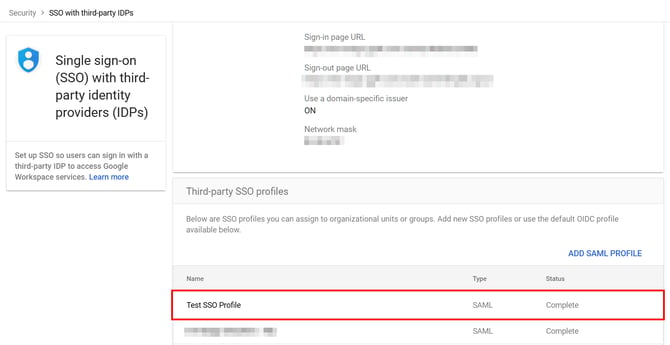
- Copy the Entity ID and ACS URL.

- Email them to support@schoolday.com. Support will confirm when configuration is complete.
Phase 5: Upload the verification certificate
After SchoolDay Support confirms setup is complete and sends the certificate:
- Go to Security > Authentication > SSO with third-party IDP > Third-party SSO profiles.
- Open the individual SSO profile.
- In the IDP details section, click Edit IDP Details.
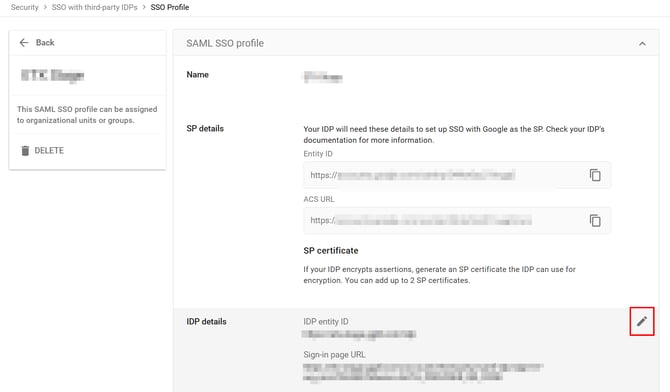
- Upload the certificate received from support.
- Click Save.
Phase 6: Test the configuration
Test with a small group before deploying to all users.
- In Google Workspace, assign the individual SSO profile to a test OU or group.
- Open a new Incognito browser tab and go to https://accounts.google.com.
- Enter the test user's email and click Next.
- Confirm you are redirected to the SchoolDay authentication screen. Complete the first MFA factor.
- Complete the second MFA factor if configured.
- Confirm successful sign-in to Google Workspace.
Troubleshooting
|
Symptom |
Cause |
Fix |
|---|---|---|
|
Users not redirected to SchoolDay at Google sign-in |
SSO profile not assigned to the correct OU or group |
Check assignments under Manage SSO profile assignments |
|
SAML error on redirect |
Incorrect Sign-in or Sign-out URL |
Verify URLs exactly match https://sso.gg4l.com/saml2/Redirect/SSO and https://sso.gg4l.com/auth/saml/SingleLogout |
|
Certificate error during sign-in |
Certificate not yet uploaded or mismatched |
Confirm the certificate from support is uploaded to the correct SSO profile |