
Attribute (field) mappings define how field names in your data source correspond to SchoolDay attributes (fields). This ensures data from your Student Information System imports into the correct SchoolDay fields.
For example, if your SIS labels student emails as "Primary_Email" but SchoolDay expects "Email Address", attribute mapping links these fields so data flows correctly during import.
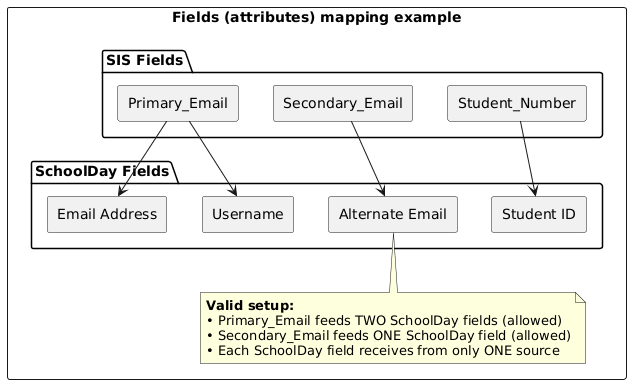
You'll complete field mappings during your initial SIS integration setup and anytime you add or restructure data in your organization.
Requirements
- Primary District Admin permissions
- An Import application already configured in SchoolDay
Access attribute mappings
- In SchoolDay Connect, select your import application.
- Click the Settings icon.
- Select the Attributes Mapping tab.
The screen displays entities (Students, Teachers, Classes) with two columns:
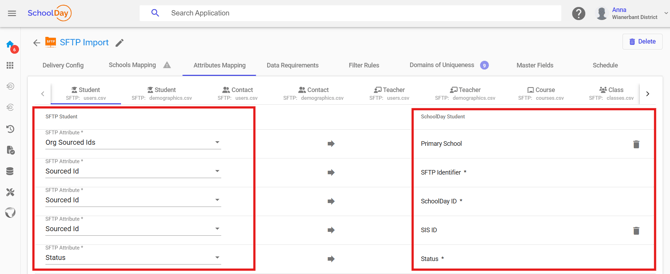
- Field names from your data source
- Field names in SchoolDay
Create an attribute mapping
- Under Attributes Mapping, select an entity.
- Find the SchoolDay field that should receive data.
- Click New Attribute Mapping.
- Select the matching data source field.
- Click Save.
- Click Run Import to apply changes.
Mapping rules:
- One data source field can map to multiple SchoolDay fields
- One SchoolDay field can only map to one data source field
Note: If a SchoolDay field is unavailable, it's already mapped. Delete the existing mapping to reuse the field.
Delete an attribute mapping
Mappings with an asterisk (*) are required and cannot be deleted.
- Go to Application Settings > Attributes Mapping.
- Select an entity tab.
- Click Delete Attribute Mapping next to the attribute.
- Click Save.
- Click Run Import to verify changes.
Verify the configuration
After creating, editing, or deleting mappings:
- Click Run Import.
- Go to the relevant record page (student, teacher, etc.).
- Confirm the mapped attributes display correct data.
Advanced: Map metadata fields
Metadata fields are additional data fields available only with OneRoster format or Native API. See OneRoster File Format for details.
Metadata field names must match exactly as provided in the specification.
Use metadata mappings to:
- Import custom fields from your SIS that don't have standard SchoolDay equivalents
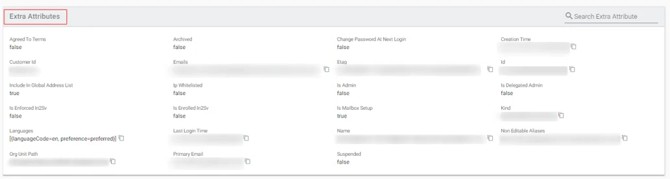
- Store additional data in SchoolDay's Extra Attributes section
- Map specific metadata values to unused SchoolDay attributes
Import all metadata
This mapping imports all metadata from your data source into SchoolDay.
- Go to Application Settings > Attributes Mapping.
- Select an entity tab.
- Click New Attribute Mapping.
- Select Metadata from both the data source and SchoolDay attribute lists.
- Click Save.
- Click Run Import.
After import, all metadata appears in the Extra Attributes section on each record.
Map one metadata field to another
Transfers one specific metadata value to a specific SchoolDay metadata field.
- Go to Application Settings > Attributes Mapping.
- Select an entity tab.
- Click New Attribute Mapping.
- Select Metadata Extension from both attribute lists.

- Enter the metadata attribute names you want to map.
- Click Save.
- Click Run Import.
After import, the mapped value appears in the Extra Attributes section on the record page.
Map metadata to a standard SchoolDay field
Populates a regular SchoolDay field (like Middle Name or Grade Level) with metadata.
- Go to Application Settings > Attributes Mapping.
- Select an entity tab.
- Click New Attribute Mapping.
- In the data source attribute list, select Metadata Extension and enter the metadata attribute name.
- In the SchoolDay attribute list, select the unused attribute you want to use.
- Click Save.
- Click Run Import.
After import, the metadata value appears in the standard field you selected.
Map a standard SchoolDay field to metadata
Transfers a regular data source attribute into SchoolDay's metadata section.
- Go to Application Settings > Attributes Mapping.
- Select an entity tab.
- Click New Attribute Mapping.
- In the data source attribute list, select the attribute you want to map.
- In the SchoolDay attribute list, select Metadata Extension and enter the metadata attribute name.
- Click Save.
- Click Run Import.
After import, the value appears in Extra Attributes under the metadata name you specified.
Troubleshooting
|
Issue |
Cause |
Solution |
|---|---|---|
|
SchoolDay field not available in dropdown |
Field is already mapped to another data source field |
Delete the existing mapping first, then create the new mapping |
|
Import fails after creating mapping |
Field names don't match exactly |
Verify field names in your data source match exactly (case-sensitive) |
|
Data appears in wrong field |
Incorrect mapping configuration |
Edit the mapping and select the correct SchoolDay field |
|
Cannot delete mapping (grayed out) |
Mapping is required (marked with asterisk *) |
Required mappings cannot be deleted; edit to change the data source field instead |
|
Metadata not appearing |
Metadata only works with OneRoster or Native API |
Confirm your import application uses OneRoster format or Native API |