Use attribute mappings to manage the exchange of attributes during the sharing.
In this article
Attributes mappings reflect the correspondence between the attribute names in the data source and the SchoolDay platform. This enables you to map the fields from the SIS/data source to any existing SchoolDay attributes.
Understand the attributes mapping
Attributes mapping enables you to build a connection between SchoolDay and your app’s attribute fields. For example, for importing "Email Addresses" as "Usernames" for students.
To view attributes mapping, choose an import app > ⚙️ Settings > Attributes Mapping tab.
 |
Legend:
-
Entities: Display connections between the entity name in SchoolDay and CSV files. A name convention for tab titles is the following:
-
The first row is the entity name in SchoolDay.
-
The second row is the entity name in the Data Source.
-
- Data source attributes: Shows the list of attributes in the data source.
- SchoolDay attributes: Shows the list of attributes in the SchoolDay system.
Create a new attribute mapping
-
Go to the Application Settings > Attributes Mapping.
- Choose an entity.
- Find a SchoolDay attribute that you want to associate with a data source attribute.
-
Click New Attribute Mapping.
- Find and select the attributes you want to map. If you are unable to find the required attribute in the SchoolDay attributes list, it could indicate that the attribute is already in use. To use the attribute for a new mapping, please delete the existing mapping.
-
To save changes, click Save.
- To see if the changes were applied successfully, Run Import.
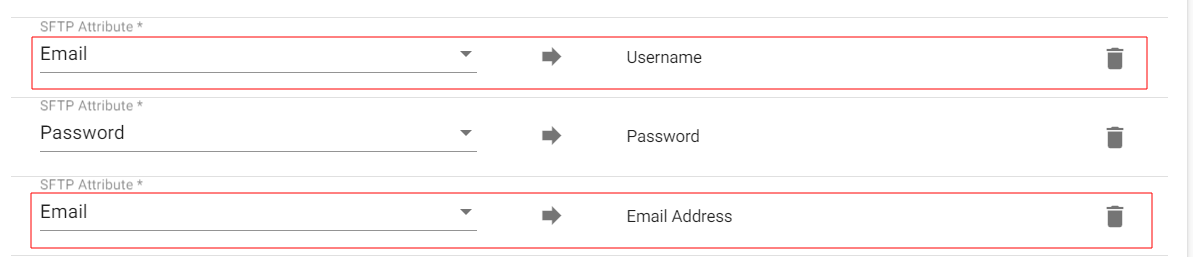
The same data source attribute can be linked to multiple SchoolDay attributes, but each SchoolDay field can only be used for mapping once. For example, you can map the "SFTP Email" to both the "SchoolDay Email Address" and Username "fields". But you cannot map both the SFTP "Username" and "Email Address" fields to the SchoolDay "Username" field.
Delete an attribute mapping
Note: Mapping rules with an asterisk (*) next to the data source attribute can not be deleted.
-
Go to the Application Settings > Attributes Mapping.
- Choose an entity.
-
Click
Delete Attribute Mapping next to the attribute you want to delete from your map.
-
To save changes, click Save.
- To see if the changes were applied successfully, Run Import.
Customize an attribute mapping
-
Go to the Application Settings > Attributes Mapping.
-
Choose an entity.
- Find a mapping you want to edit.
-
Choose a new attribute from the data source attributes list.
-
To save changes, click Save.
-
To see if the changes were applied successfully, Run Import.
Map metadata
SchoolDay allows the flexible metadata mapping to any available attribute or metadata field within SchoolDay.
Note: Metadata is only available if you use the OneRoster data schema or Native API. To learn more about metadata in OneRoster CSVs, see OneRoster File Format.
The metadata field name must match exactly with the name provided in the specification.
Below are some examples of metadata mappings.
1. Entire metadata
This mapping enables the import of the entire data metadata into SchoolDay.
To map the entire data source metadata, choose Metadata from both attribute lists, save changes, and then run sync.

Once the sync is completed, the entire metadata appears in the Extra Attributes section on the record page.

2. Single metadata field to a single metadata field
This mapping allows you to transfer a single value from the Data Source metadata array (instead of the entire array) to a particular value from the SchoolDay metadata array.
To use this metadata mapping, under Attributes Mapping:
- Click New Attribute Mapping.
- Choose Metadata Extension from both attribute lists and enter the metadata attribute names you want to map.

- Click Save and run a sync.
Once the sync is completed, the mapped value appears in the Extra Attributes section on the record page.

This metadata mapping enables you to transfer a single value from the data source metadata (instead of the entire metadata) to a specific unused SchoolDay attribute.
To use this metadata mapping, under Attributes Mapping:
- Click New Attribute Mapping.
- Do the following:
- Data source attribute list: Choose Metadata Extension and enter the metadata attribute name you want to map.
- SchoolDay attribute list: Choose the unused attribute which you want to associate with the data source metadata attribute.

- Click Save and then run a sync.
Once the sync is completed, the mapped value appears in the chosen SchoolDay field on the record page.

4. Single attribute to a single SchoolDay metadata field
This metadata mapping allows you to transfer any data source attribute to a particular field from the SchoolDay metadata.
To use this metadata mapping, under Attributes Mapping:
- Click New Attribute Mapping.
- Do the following:
- Data source attribute list: Choose the metadata field name you want to map.
- SchoolDay attribute list: Choose Metadata Extension and enter the metadata attribute name you want to associate with the data source metadata attribute.

- Click Save and then run a sync.
Once the sync is completed, the mapped value appears in the Extra Attributes section on the record page.