
In this article
An SFTP relay forwards files from one SFTP server to another. SchoolDay moves the files as-is and never reads their contents, so the file format doesn't matter — including formats SchoolDay can't read, such as encrypted files.Step 1: Activate the application
Step 2: Configure the source server
Step 3: Configure the target server
Step 4: Map the files to forward
When to use a relay
Use a relay when files need to move between two servers and SchoolDay doesn't need to understand them. Use an import or export instead when SchoolDay needs to read the file and turn it into roster data.
|
Your goal |
Use |
|---|---|
|
Bring roster data into SchoolDay from CSV files |
|
|
Send SchoolDay data out as CSV files |
|
|
Move files between two servers, unchanged |
This article |
A relay has no Data Schema, Schools Mapping, or Entity Mapping step. Nothing is being interpreted, so there is nothing to map. Relayed files never enter your roster data and never appear in data quality reports.
Before you begin
- Primary District Admin permissions.
- Two SFTP servers: a source to read files from, and a target to write them to. Unlike an import or export, both sides are servers you or your vendor control.
- Credentials for each server. Each side can use a password or an SSH key, independently of the other.
- The exact file names to forward, and the names they should have on the target.
Activate your SchoolDay admin account first if you haven't. The activation link emailed to you is valid for 24 hours. Contact support@schoolday.com for a new one if it expires.
Step 1: Activate the application
- Go to Connect > Application Gallery.
- Find SFTP Relay and click Activate.
To rename the integration, click the pencil next to SFTP Relay in the page header.
Step 2: Configure the source server
The source is the server SchoolDay reads files from.
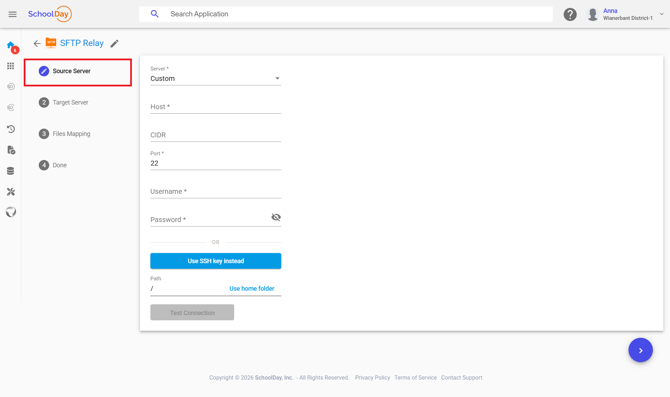
- On the Source Server step, enter the connection details:
|
Field |
Description |
|---|---|
|
Server |
Select which server to use. Select Custom to connect to your own server. |
|
Host |
Required. The hostname of the source server. For example, |
|
CIDR |
The IP address of your server in CIDR notation. For example, |
|
Port |
Required. Default is |
|
Username |
Required. The username used to connect. |
|
Password |
Required unless you use an SSH key. Click the eye icon to check what you typed. |
|
Path |
The folder holding the files to forward. Default is |
- To authenticate with a key instead of a password, click Use SSH key instead. See Authenticate SFTP exports with a password or SSH key for the key setup steps.
- To read from the root folder, click Use home folder.
- Click Test Connection.
Test Connection stays unavailable until every required field is filled. Fix any error before moving on.
Step 3: Configure the target server
The target is the server SchoolDay writes files to. It uses the same fields as the source, with two differences: there is no Server list — a target is always your own server — and there is an extra option.
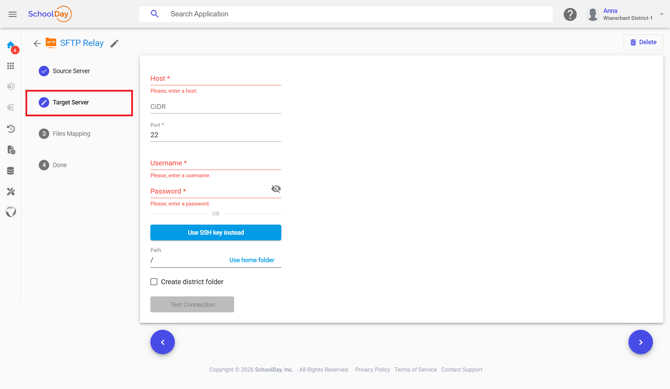
- On the Target Server step, enter the connection details.
- Select Create district folder to deliver files into a separate folder per district, named as the district's GUID. Leave it blank to deliver files directly to the path.
- Click Test Connection.
The source and target must be different servers.
Step 4: Map the files to forward
Only files you list here are forwarded. A file on the source server that isn't mapped is ignored.
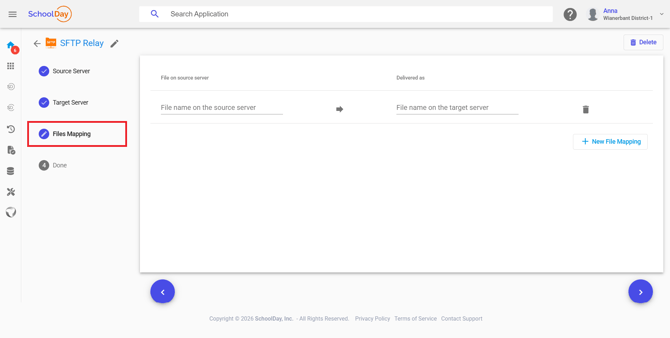
- On the Files Mapping step, click New File Mapping.
- Under File on source server, enter the file's name on the source.
- Under Delivered as, enter the name it should have on the target. To keep the same name, enter it again.
- Repeat for each file.
- To stop forwarding a file, click the trash icon on its row.
Files are delivered under the name in Delivered as, overwriting any existing file with that name on the target.
Step 5: Set the schedule
The Schedule step controls how often the relay runs and how much it sends each time.
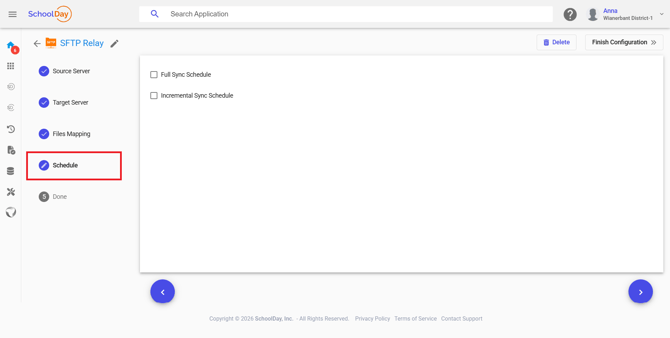
Select either option, or both:
- Full Sync Schedule: every mapped file is sent on every run, whether it changed or not.
- Incremental Sync Schedule: only files that changed since the last successful delivery are sent.
Running both is the usual setup: an incremental schedule that runs often to move changes quickly, and a less frequent full schedule that re-sends everything as a safety net.
A file counts as changed when its contents differ from the last copy SchoolDay delivered successfully. A file SchoolDay has never delivered always counts as changed, so the first run sends everything either way.
Incremental sync compares whole files, not the records inside them. A single changed byte sends the whole file; an identical file is skipped entirely.
If a delivery fails, SchoolDay does not record it as delivered, so the file is retried on the next run.
Step 6: Save the configuration
Click Finish Configuration.
You can reopen the integration and edit any step afterward, except while it is locked or a run is in progress. Wait for the run to finish, then edit.
To remove the integration entirely, click Delete.
Verify the configuration
- Confirm Test Connection succeeded on both the Source Server and Target Server steps.
- Place a test file on the source server under one of your mapped source names.
- After the next scheduled run, confirm the file arrives on the target under its Delivered as name.
Troubleshooting
|
Symptom |
Cause |
Fix |
|---|---|---|
|
Test Connection is greyed out |
A required field is empty |
Fill Host, Port, Username, and Password (or set up an SSH key) |
|
Test Connection fails on one side only |
Credentials or path are wrong for that server |
Re-check the host, port, username, and path for that step. The two servers are configured independently |
|
Test Connection fails after generating an SSH key |
The public key isn't in the server's authorized_keys file yet |
Copy the public key again and confirm the server owner added it |
|
A file isn't forwarded |
It isn't in Files Mapping |
Add a row for it. Only mapped files are forwarded |
|
A file isn't forwarded, and it is mapped |
On an incremental run, the file hasn't changed since the last successful delivery |
Expected behavior. Add a Full Sync Schedule if the target needs a copy on every run |
|
The wrong file name appears on the target |
The Delivered as name differs from the source name |
Check the row in Files Mapping |
|
Files land in an unexpected folder on the target |
Create district folder is selected |
Clear it to deliver straight to the path |