The customer portal is your central location to manage support requests. You can register an account, log in, view open and closed tickets, search for past issues, reply to support responses, and attach files — all without leaving one interface.
Requirements
- An active SchoolDay account.
- An invitation email from SchoolDay (sent to your registered email address).
- Access to https://help.gg4l.com/support.
Step 1: Register your account
To use the customer portal, you must first create an account using your invitation email.
- Open the invitation email from SchoolDay.
- Click the registration link in the email. A registration page will load (shown below).
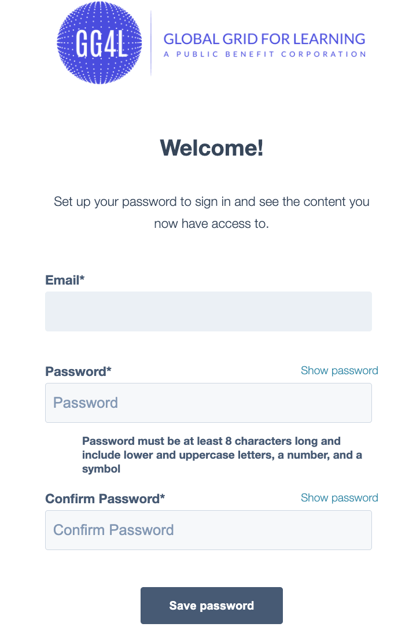
- Enter your Email address.
- Enter your desired Password (you will use this to log in).
- Click Save password.
Your account is now active and ready to use.
Step 2: Log in to the customer portal
- Navigate to https://help.gg4l.com/support.
- Enter your Email address.
- Enter your Password.
- Click Sign in.
You are now logged in to the portal dashboard.
Reset your password
If you cannot remember your password:
- On the login page, click Forgot the password?
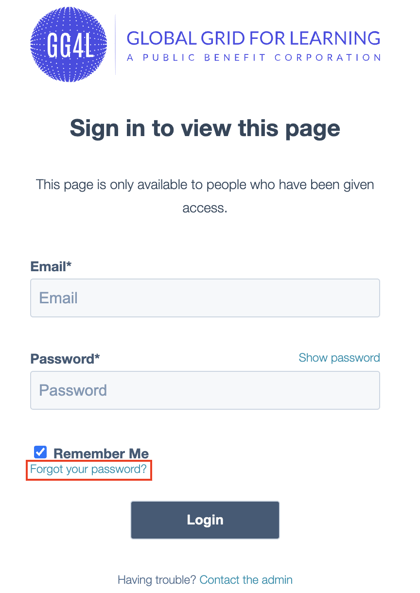
- Check your email for the reset link.
- Click the link to set a new password.
Step 3: Navigate the portal menu
Once logged in, use the portal menu to access key sections. The menu appears in the top left of the screen.
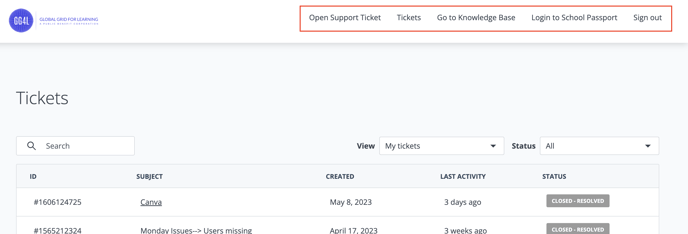
The menu includes:
- My Tickets — View all your support tickets.
- Knowledge Base — Browse help articles and resources.
- School Passport — Access your School Passport account.
- New ticket — Open a new support request (or use the primary action).
Step 4: Open a new support ticket
- From the menu, select a ticket. A ticket form will load.
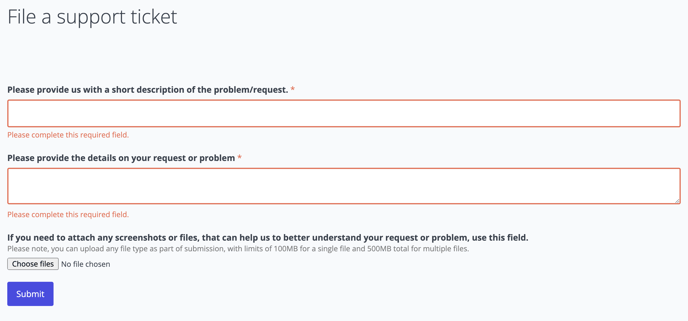
- Enter the Subject (title of your request).
- Enter a Description of your issue or request.
- (Optional) Click Attach file to add a supporting document, screenshot, or video (up to 30 MB).
- Click Submit to create the ticket.
- You will receive a confirmation with your ticket ID.
Supported file types:
The portal accepts the following file types (max 30 MB per file):
-
Media: video, audio, gif, jpeg, jpg, png, tiff
-
Documents: pdf, msword, ms-excel, ms-powerpoint
-
Data & code: json, csv, plain-text, css, zip, vnd, calendar
Step 5: View and filter your tickets
- From the menu, click My Tickets.
- The ticket list page opens, showing your open and closed tickets.
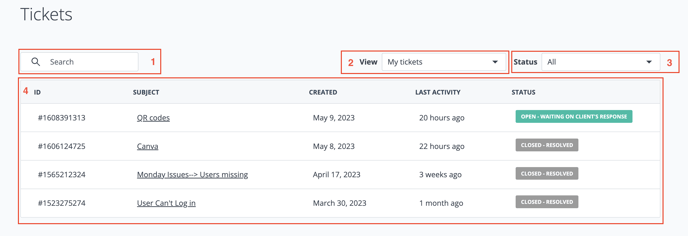
On the ticket page, you can:
- Search — Use the search field to find a ticket by name or ID.
- Filter by view — Select Individual tickets (your requests only) or Organization tickets (all requests from your organization).
- Filter by status — Choose All, Open, or Closed tickets.
Ticket list columns
- ID — Unique ticket identifier.
- Subject — Ticket title.
- Created — Date the ticket was opened.
- Last Activity — Most recent update on the ticket.
- Status — Current status (Open or Closed).
Step 6: Reply to a ticket
- From the My Tickets list, choose a ticket.
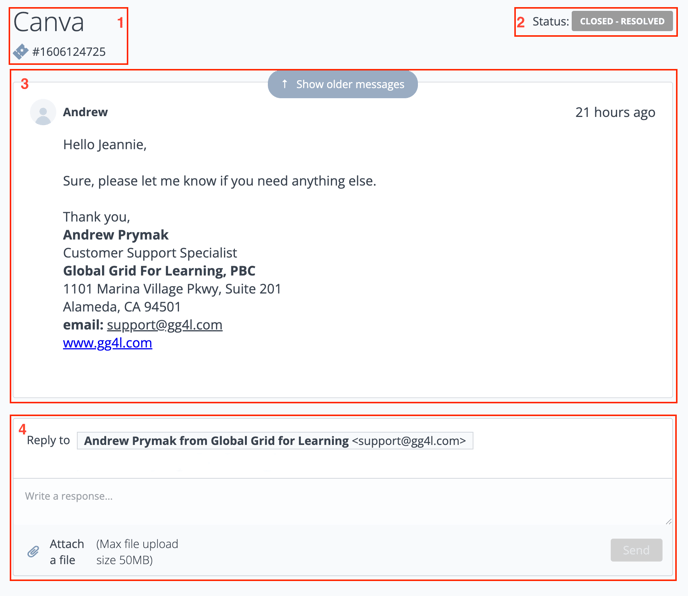
On the ticket detail page, you can view:
- Ticket name and ID — At the top of the page.
- Ticket status — Current state (Open or Closed).
- Communication history — All messages, newest first. Only the latest email is visible initially.
- Click Show older messages to expand the full conversation history.
Reply to the support team
- Scroll to the Reply to section (at the bottom of the ticket).
- Add or remove recipients as needed.
- Type your response in the Message field.
- (Optional) Click Attach file to add a supporting document (up to 30 MB).
- Click Send to submit your reply.
- Your message is now part of the ticket thread.
Step 7: Access the knowledge base
For self-service support, browse articles in the SchoolDay Knowledge Base without opening a ticket.
- From the menu, click Knowledge Base.
- Search by keyword or browse categories to find relevant articles.
- Click any article to read it.
Step 8: Sign out
When you are finished using the portal:
- Click Sign out in the top right
- Click Sign out to confirm or Return to home to go back to the login page.